Resources are the People, Places, and/or Equipment you need to produce an event. Requests can be added to a Schedule or Event Instance, and requested either before, during, or after an event.
About Resources
Resources come in two flavors: Types and Resources. Types are general kinds of things - roles that can be filled by multiple people, places, or pieces of equipment. Resources name specific people, places, or equipment. Resources are often things you already have on hand - rooms in your venue, specific employees, equipment you already possess.
| People | Places | Equipment |
| Type | Resource | Type | Resource | Type | Resource |
| Bus Driver Tour Guide Docent Interpreter | Otto Mann Kenneth Parcell Jack Jason | Conference Room Lecture Hall Boat Outdoor Space | East Gallery Room 120 Dining Room 2 The Sea Story | Projector Trays Tables Furniture | 4K Projector - SN1234 Silver serving tray 60" Round Sofa Podium |
Creating a Resource
- In ACME Back Office, click on "Resources" in the left navigation panel.
- Select "People", "Places", or "Equipment" from the expanded Resources menu.
Creating a Specific Resource (a specific person, place, or piece of equipment)
- Click on the People, Places, or Equipment tab. (Next to the Types tab.)
- Click "+Add People", "+Add Places", or "+Add Equipment" in the upper right corner of the screen. In the window that pops up, enter:
- For People:
- Select from the list, or click "Crete New". If creating a new resource, enter:
- First Name
- Last Name
- Select from the list, or click "Crete New". If creating a new resource, enter:
- For Places:
- Place Name (e.g. "West Gallery")
- Description
- Capacity
- For Equipment:
- Equipment Name (e.g. "Ladder")
- Description
- For People:
- Click "Add People", "Add Place", or "Add Equipment".
- A new menu will open up. Here you can enter:
- Photo: click anywhere in the Photo box to upload a photo of the Resource. Click "Change" to change your photo.
- Type: under "Types and Attributes", click "+Add a type" to associate this specific Resource with a type. At least one type is required in order to be able to assign this Resource to a Request. If your Type has attributes, a drop-down menu or check list will appear, letting you specify attributes. Note: you can only choose from pre-existing Types. To create a new Type, see the next section.
- Availability: By default, resources are always available. Click "+Add more available times" or "+Add more unavailable times" to specify when your Resource is available and unavailable. This can be useful if certain rooms in your venue are closed at certain times, or if employees are only available at certain times, or if pieces of equipment are in use when you might need them.
- Click "Save Changes" in the upper right of the screen to save your Resource.
Creating a Resource Type (a general category)
- Click on the Types tab.
- Click "+Create Type" in the upper right corner of the screen.
- In the menu that opens up, enter:
- Name: click in the "New" box. This is the Name of your Resource Type (e.g. "Tour Guide", "Dining Hall", "Projector").
- Description: a description of your Type
- Attributes: Attributes can help divide your Resources into useful categories. If your Type is "Tour Guide", for example, you may want to specify Attributes such as "Can do Special Collections", "Can lead Children's Tour", and so on.
- Click "+Add an option".
- Enter the Attribute in the box.
- Continue to add Attributes as desired
- When done, use the drop-down menu at the right to decide if you'd like to list Attributes as checkboxes or in a drop-down menu.
- Click "Save Changes" in the upper right of the screen to save your Type.
Adding a Resource to a Schedule
To add a Resource to your Schedule, you need to have the Resource created already.
To locate your Event Schedule:
- Log in to the ACME Back Office.
- Click on "Events" in the left navigation panel.
- Select "Templates" from the expanded Events menu.
- Click "Edit" next to the Template you'd like to add a Resource to.
- Click the Schedules & Resourcing tab.
- Click "Edit" next to the Schedule you'd like to add a Resource to.
- Click the Resources tab.
Once in Resources, you should:
- Click "+Resource Request". (NOTE: "+Resource Before" and "+Resource After" have the same functionality as "+Resource Request". We recommend simply using "+Resource Request")
- In the window that pops up, enter:
- Category: specify whether you're looking for "People", "Places", or "Equipment".
- Request for:use the drop-down menu to specify "Type" or "Resource". You can then use the next drop-down menu to choose from the resources you've already created.
Note: you can only assign Resources that have already been created. To learn about creating Resources, visit Create a Resource.
- Attributes: this field is optional. If your resource is not in the system already, you can describe it here. You can also use this space to clarify your request (e.g. if you're looking for a film screening room, you can put "must seat 200 people" in this field).
- Timeframe: specify when you need your resource. This time frame is always tied to the timing of Event Instance: you can request your resource any time before or after the Event begins, and call for it to be returned or vacated (or go home, if it's a person!) any time before or after the Event ends. Once you specify a start time, you can also specify a duration instead of a specific ending time.
- Notes: optional
- Click "OK" to add this Resource to your Event Schedule.
Adding a Resource to an Event Instance
You can also add Resource Requests directly to Event Instances.
To locate your Event Instance:
- Log in to the ACME Back Office.
- Click on "Events" in the left navigation panel.
- Click "Edit" next to the Event you'd like to add a Resource to.
- Click the Resources tab.
Once in Resources, you should:
- Click "+Resource Request".
- In the window that pops up, enter:
- Category: specify whether you're looking for "People", "Places", or "Equipment".
- Request for:use the drop-down menu to specify "Type" or "Resource". You can then use the next drop-down menu to choose from the resources you've already created.
Note: you can only assign Resources that have already been created. To learn about creating Resources, visit Create a Resource.
- Attributes: this field is optional. If your resource is not in the system already, you can describe it here. You can also use this space to clarify your request (e.g. if you're looking for a film screening room, you can put "must seat 200 people" in this field).
- Timeframe: specify when you need your resource. This time frame is always tied to the timing of Event Instance: you can request your resource any time before or after the Event begins, and call for it to be returned or vacated (or go home, if it's a person!) any time before or after the Event ends. Once you specify a start time, you can also specify a duration instead of a specific ending time.
- Notes: optional
- Click "OK" to add this Resource to your Event Instance.
Assign a Resource to a Request
To assign a resource to a Request, see How to assign resources to resource requests
Email a Resource when an assignment changes
If you'd like, you can have the system send emails to "People Resources" i.e. (resources who are specific people) when key details of an assignment change. For example, you can have an email sent when:
- There is a new assignment
- The assignment has changed
- Event date/time changed
- Event is canceled
To enable this feature:
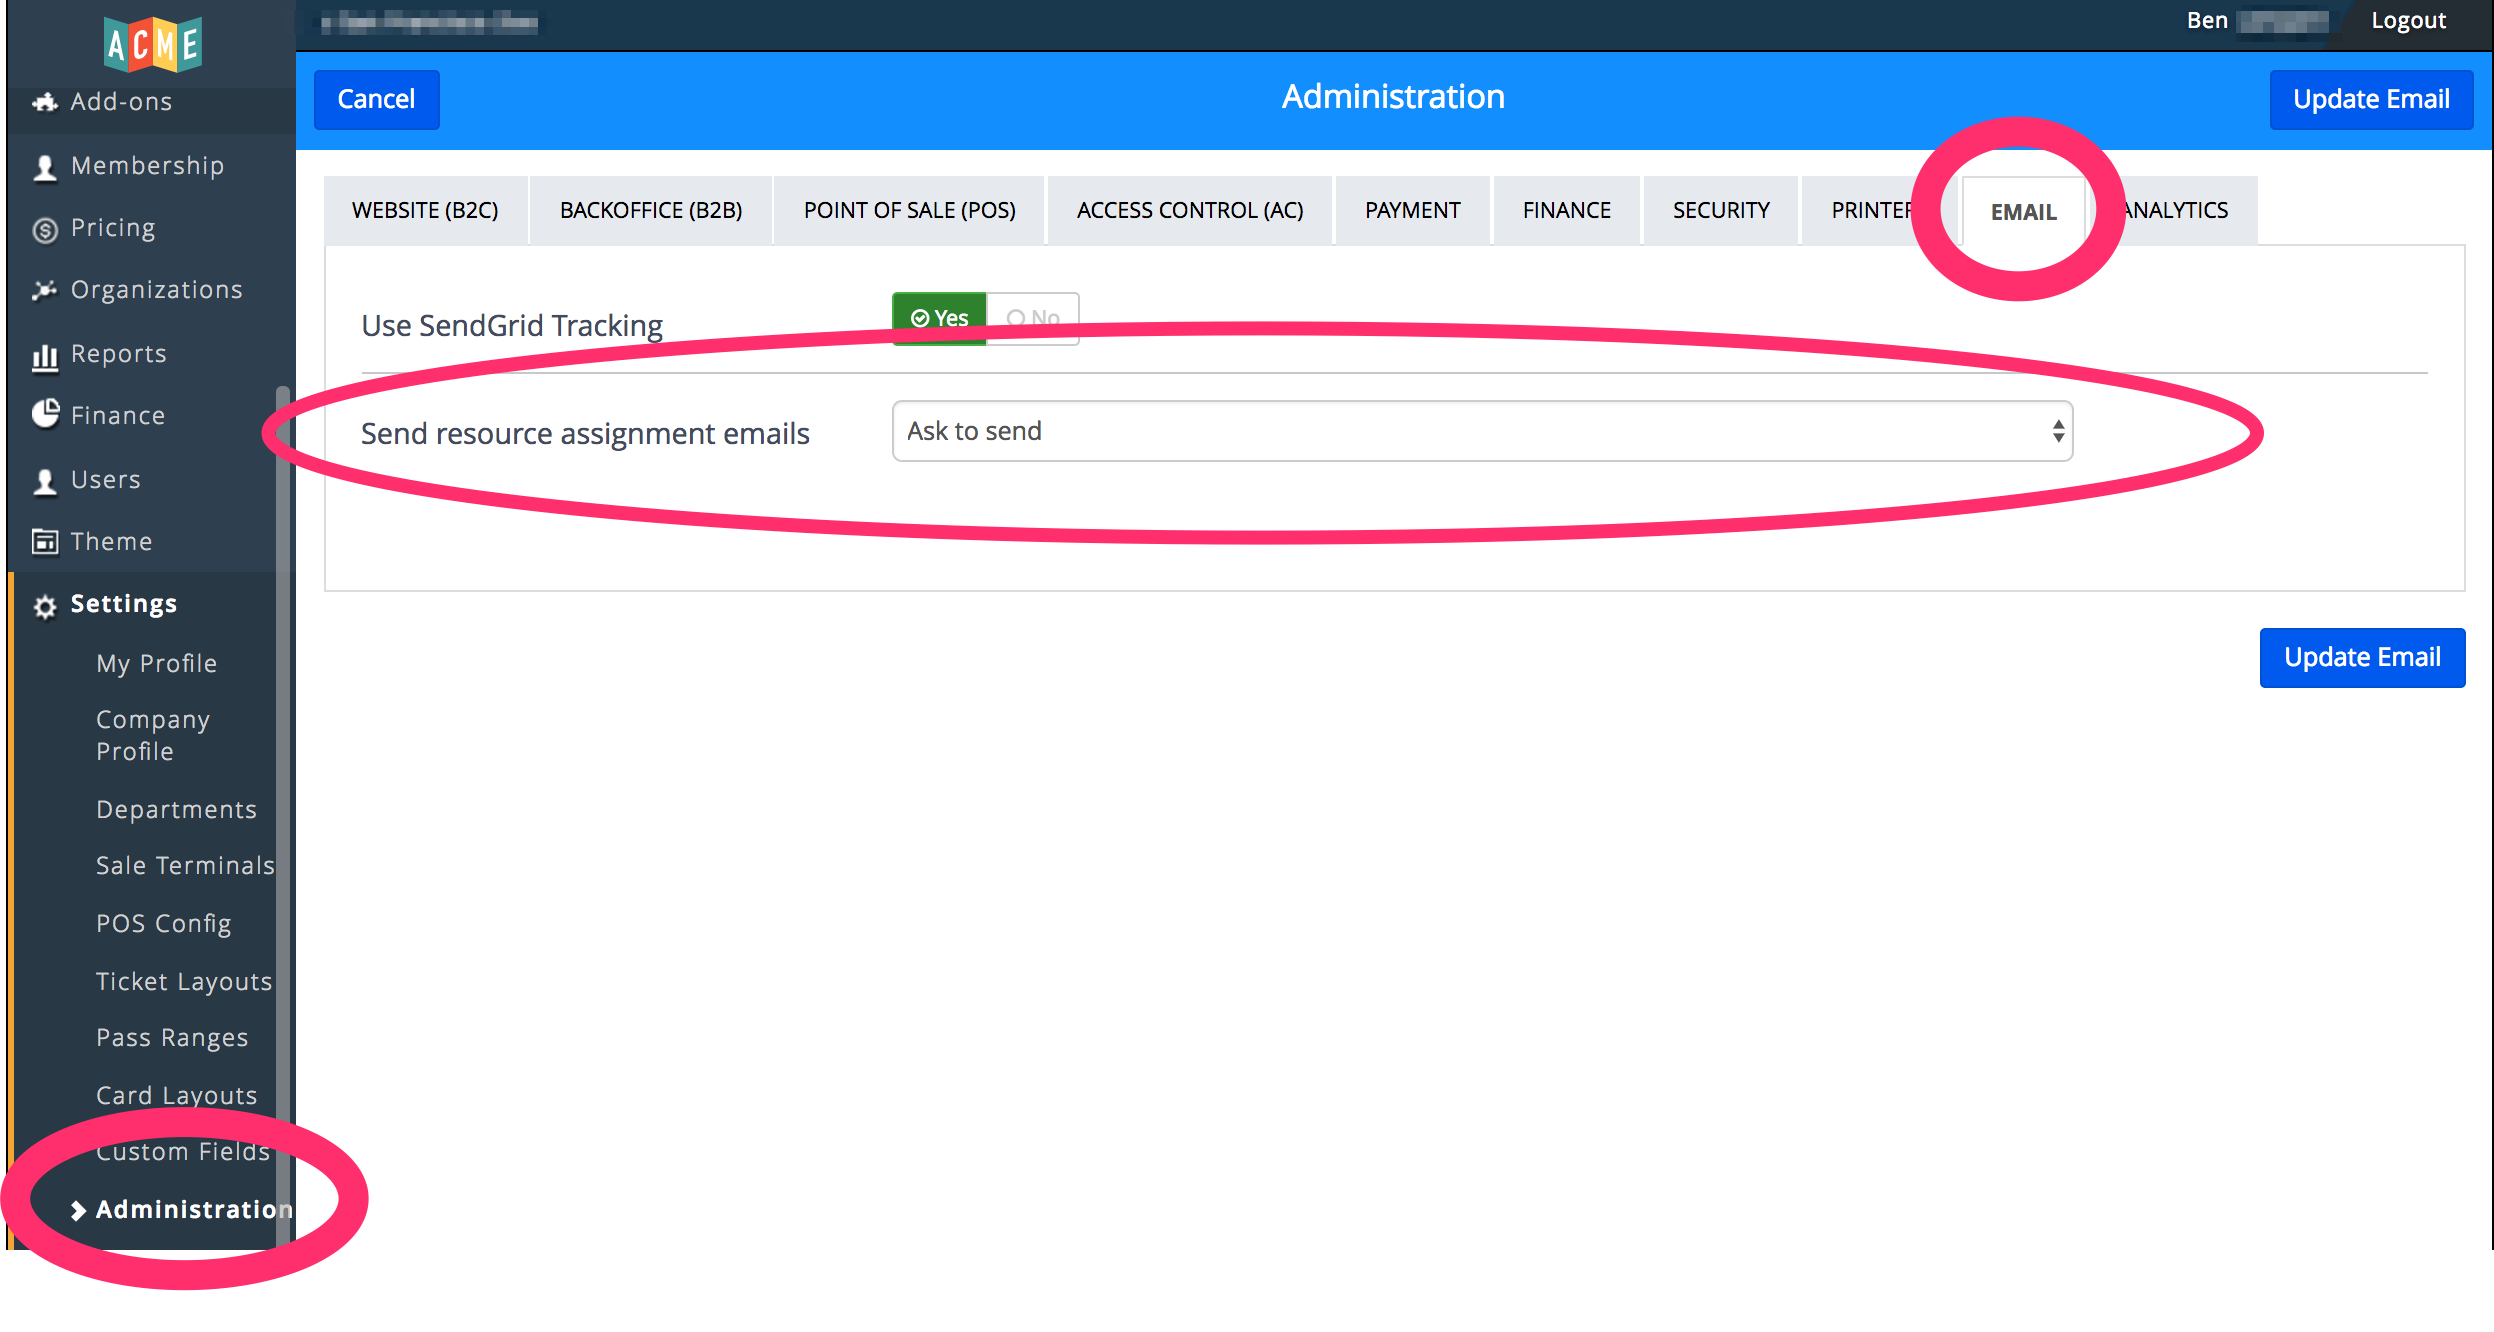
- Log in to the ACME Back Office.
- Click on "Settings" in the left navigation panel.
- Select "Administration" from the expanded Settings menu.
- Click the Email tab.
- In "Send resource assignment emails," choose:
- Always: Emails will always be sent to Resources if anything changes on the Template or Schedule level.
- Never: Emails will never be sent to Resources.
- Ask to Send: When you set up a Resource, you'll have the option of notifying the Resource when details change.
- Click "Update Email" to confirm your changes.
If you do not have access to the "Administration" settings, feel free to contact your ACME Client Service Manager, who can configure this setting for you.
View Resources on the POS
If you're on the POS, you can view Resources for any Event. Just go to "Order Management" and select your Event. There will be a button that says "Resources". Click it and you'll see the Resources assigned to the Event