Price Lists are collections of Ticket Categories. Price Lists specify the ticket types and prices for an Event. Once you've set up a Price List, you can add it to an Event Template to set up the pricing structure for the Event.
Individual Price Lists can be used in as many different Event Templates as you'd like.
Note: In order to create Price Lists, you'll need to have already created your Ticket Categories. Read more about about Ticket Categories.
TABLE OF CONTENTS |
About Price Lists
Once created, a Price List can be used in multiple Event Templates, Event Schedules, and Event Instances.
You can create as many different Price Lists as you want. Many organizations create multiple Price Lists, which they use in different Events.
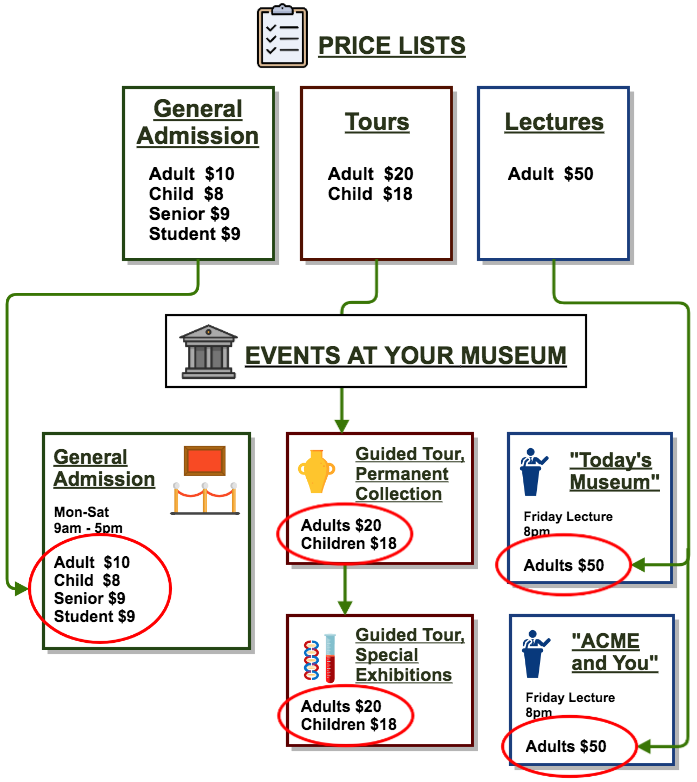
Example:
Your Museum hosts five different Events. In addition to General Admission, you also offer guided Tours of your collection, and once a month you host a special Lecture.
To organize these Events, you create three Price Lists:
- Your "General Admission" Price List is used for standard ticket sales.
- Your "Tour" Price List is used for guided tours.
- Your "Lecture" Price List is used for Lectures.
ACME always recommends having a separate Price List for your main Admissions event. Generally, this event has the most available ticket categories, so keeping this separate from smaller events like Lectures and Group Tours helps to keep those price lists more streamlined.Creating a Price List
Before you create your first Price List, ACME strongly recommends that you sit down and plan out how your Ticket Categories, Price Lists, and Event Templates will fit together and feed into reporting. Doing this prep work can save you time in the future.
- Log in to the ACME Back Office.
- Click on "Pricing" in the left navigation panel.
- Select "Price Lists" from the expanded Pricing menu.
- Click "Create Price List" in the upper right corner of the screen.
- In the popup window, enter:
- Name: the Name of the Price List (e.g. "Lecture").
- Description: an optional Description of the Price List (e.g. "Pricing for monthly Lectures"). This doesn't show up anywhere else on your website.
- Eff. Start Date: Optional. This is only for reference purposes, and will not restrict the ability to purchase tickets.
- Eff. End Date: Optional. This is only for reference purposes, and will not restrict the ability to purchase tickets.
- Click "Create Price List" to save the list.
- Click "Edit this price list".
- In the "Configure Ticket" window, enter:
- Category Type: Click "Individual" here. The "Combo" option is reserved for future functionality.
- Ticket Category: use the drop-down menu. You should see a list of Ticket Categories. Choose the one you'd like. If you haven't set those already, click here.
- Description: a description of the Ticket Category (e.g. "Age 18-65"). This field is optional.
- Price: the price for that Ticket Category. You do not need to enter the dollar sign - "24.25" will be entered as "24.25".
- Click "Add Price" to add this Ticket Category and Price to your Price List.
- Repeat Steps 6 and 7 to add more Ticket Categories and Prices to your Price List.
- When you're done, click "Save & Close" at the bottom of the Price List to save your changes.
Your Price List is now ready to add to an Event Template.
NOTE: Any single ticket type can only be used once per price list.Best Practices
- We recommend creating your price lists with the correct prices, descriptions, and sales channels exactly as it will be used in the master price list area (Pricing > Price Lists).
- When using that Price List for events, do not make edits at the template or schedule level.
- Benefit: When used in this way, any edits later made to the master price list will automatically flow to all event templates, schedules, and individual instances using that Price List, without any further modification to templates or republishing needed.
- If price list edits are made at the template or schedule level, then any future updates that are made to the master price list will not flow down to that event.
Editing an Existing Price List
Note: Editing a Price List will immediately update every Event that uses that Price List, provided further edits have not been made at the Template or Schedule level (see Best Practices above). For this reason, we suggest editing Price Lists outside of normal business hours.
- Log in to the ACME Back Office.
- Click on "Pricing" in the left navigation panel.
- Select "Price Lists" from the expanded Pricing menu.
- Click on the Price List you'd like to edit.
- Click "Edit List" in the upper right of the screen.
- Double click on any of the following fields to edit:
- Description: this can be a useful field to edit if you'd like to describe a Category differently in different Price Lists. For example, an Adult ticket may be "Age 18-65" in one Price List, but "Age 25-65" in a different Price List.
- Price: click to change the Price.
- Sales Channels: you can edit Sales Channels here, although whatever changes you make will be overridden by changes made at the Template or Schedule level.
- The Name field cannot be edited here. If you'd like to create a new Ticket Category, you have to do so in Ticket Categories.
- Click "Remove" to remove a Ticket Category from the Price List.
- Click "Save & Close" to save your changes.
Change the Display Order
- Log in to the ACME Back Office.
- Click on "Pricing" in the left navigation panel.
- Select "Price Lists" from the expanded Pricing menu.
- Click on the Price List you'd like to edit.
- Click "Change Display Listing" in the upper right of the screen.
- Click the up and down arrows to reorder your Ticket Categories.
- Click "Save & Close" to save your changes.
Troubleshooting
If you have made an update to an existing price list and the change doesn't appear on an event, this indicates that at some point in the past, the price list was edited and is no longer receiving the updates.
- You can fix this with the method outlined in the Pricing and Discount FAQs.
Duplicating a Price List
There are times when you may want to reuse an existing Price List, but change the prices in it. For example, in all of the following you will likely want to keep the same Ticket Categories as your General Admission Price List, but give them different prices:
- Preparing for an annual ticket price increase
- Offering reduced pricing for a special event
- Reducing prices for Seniors in the evenings
Rather than create a new Price List from scratch, in these cases it can be easier to duplicate an existing Price List and give it a new name (e.g. "General Admission, evenings"). This lets you make a new version of an existing Price List without worrying about the changes impacting existing events.
- Log in to the ACME Back Office.
- Click on "Pricing" in the left navigation panel.
- Select "Price Lists" from the expanded Pricing menu.
- Click on the Price List you'd like to duplicate.
- Click "Duplicate List" in the upper right of the screen.
- Give the duplicated Price List a new name.
- Click "Add Price List" to save your changes.
- Click "Edit List" to change prices on your new list.
- Click "Save & Close" to save your changes.