
TABLE OF CONTENTS |
Prerequisites
Get Spreadsheet of ticket type, prices, etc from client. Sheet should include separate columns for ticket type/name, price list name, description (optional), price (plain #s only, no $), display order. Sales channels can be specified if needed.
Validate data for spelling errors and formatting issues. Prices should be entered as plain text, no $. Double quotes: " cannot be present in any ticket types or descriptions.
The following templates assumes that data is in the following order in the source spreadsheet:
id, name, description, active, type, price, displayOrder, group
Generate Tickets and get Ticket IDs
- Using the source spreadsheet provided, download the ticket types into a CSV. The header for that column must be Ticket so it matches the variable configured in the body of the call.
- Open Postman, and update your environment to the correct location.
- Open the Get Session call and get a session for the matching Env and the correct tenant.
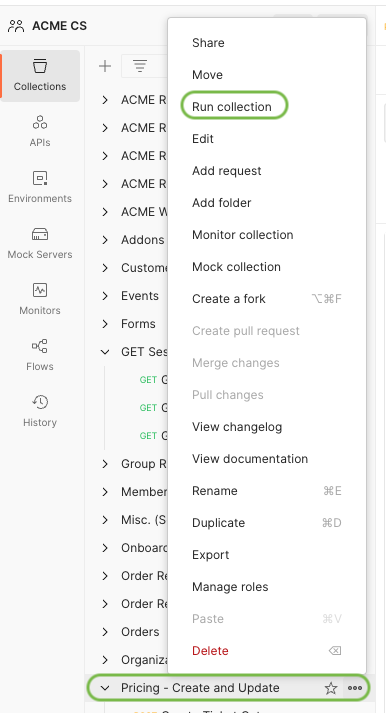
- On the "Pricing - Create and Update" collection, open the menu and select Run Collection.
- Uncheck the other calls so only Create Ticket Category is selected, and then upload the CSV generated in step 1. Once it has been added, the iteration number will update automatically.
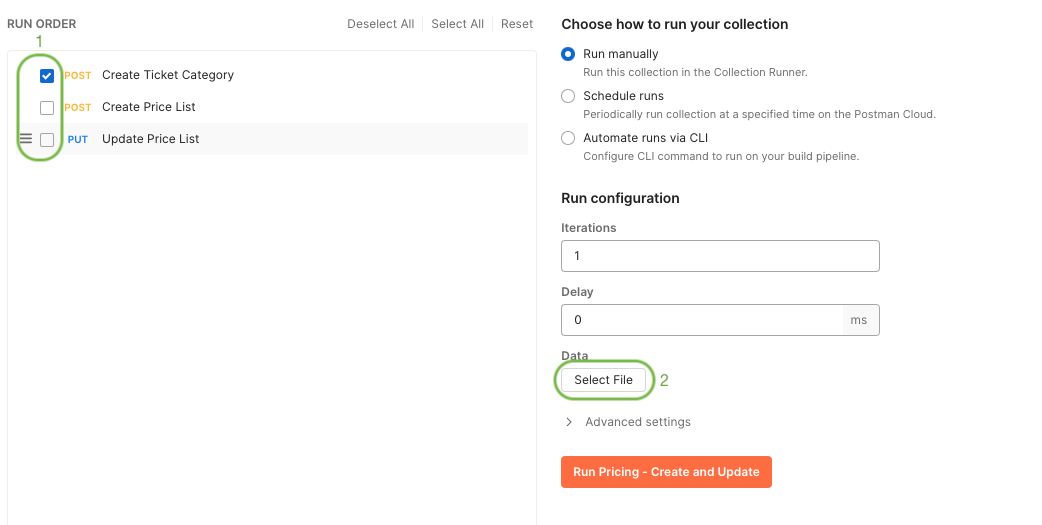
- Run the collection. Check the responses for any 400 errors indicating that ticket type was not successfully created.
- In the "Pricing - View" collection, open the Get ticket types get call and send it. Copy the response to get the newly generated IDs for the ticket types that were created.
- Paste them into a new tab in your source spreadsheet, adding additional columns to the right for price, sort order, and group. The columns should be in this order:
- id
- name
- description
- active
- type
- Price (formatted as a number only, no $)
- displayOrder
- Group
- id
Validate and link IDs with Price List data
- In your source spreadsheet on the original tab, select the block of rows (not including the header) and include the columns for name, price, display order and group. In Order, the columns should be
- Right click, select View more cell actions, and define as a named range. Enter a name like SourceData (no spaces).
- In your new tab with the ticket names and IDs, add 3 more column headers for price, display order, and group.
- On the first line of data, in the empty price cell, create a =VLOOKUP formula as follows: =VLOOKUP($B2,SourceData,2,false). This formula specifies the cell to search on in the named range ($B2), the named range from step 2 (SourceData), which column in the named range to pull data from (2 means column 2, and should have the same data points in the source range that you want to insert into the selected cell), and the match criteria (false means near matches are not accepted and it must be an exact match).
- Expand the formula down the rows and across columns, updating the 3rd value in the formula to reference other columns as necessary.
- Copy the output and paste it over the formula to save the data.
- You now have matched up the additional data points to the new IDs that were generated.
Generate Price List JSONs and post to ACME
- If you are creating multiple Price Lists, start by filtering on the group column to see one price list at a time.
- MAKE SURE THAT THE PRICING COLUMN IS NUMBERS ONLY to 2 DECIMALS; NO $
- Copy the data for just that price list into another tab WITH a header row (only needed if you have data for multiple price lists) before downloading it as a CSV.
- Open https://www.convertcsv.com/csv-to-json.htm and upload the CSV in step one. Skip steps 2 and 3.
- In Step 4, put the following parameters in:
- Top: {br}
- Repeating Section for each Line of CSV:
{
            "personType": {
                "id": "{f1}",
                "name": "{f2}",
                "description": "",
                "active": true,
                "type": "Individual",
                "displayOrder": 0
            },
            "price": "{f6}",
            "primePrice": "0.00",
            "salesChannels": [
                {
                    "name": "Web",
                    "channel": "online",
                    "enabled": true
                },
                {
                    "name": "Customer Rep",
                    "channel": "customerRep",
                    "enabled": true
                },
                {
                    "name": "Point of Sale",
                    "channel": "pointOfSale",
                    "enabled": true
                },
                {
                    "name": "Manual Entry",
                    "channel": "manualEntry",
                    "enabled": true
                },
                {
                    "name": "Reseller",
                    "channel": "reseller",
                    "enabled": true
                },
                {
                    "name": "Kiosk",
                    "channel": "kiosk",
                    "enabled": false
                },
                {
                    "name": "ISV",
                    "channel": "isv",
                    "enabled": true
                }
            ],
            "displayOrder": {f7},
            "discountedPrice": "{f6}"
}, - Bottom: {br}
- Click the Convert CSV to JSON via Template button.
- Copy the output (or download) to use in Postman.
- In Postman, open the Create Price List call.
- In the body, update the following:
- Update line 2 to be the name you want for the Price List, remove the {{}}.
- Replace lines 5-55 with the JSON you created in step 6.
- Send the call to create the new Price List.
- Repeat as necessary, and close the call without saving when finished.